关于Netty ByteBuf 的零拷贝( 二 )
byte[] bytes = ...ByteBuf byteBuf = Unpooled.wrappedBuffer(bytes);可以看到, 我们通过 Unpooled.wrappedBuffer 方法来将 bytes 包装成为一个 UnpooledHeapByteBuf 对象, 而在包装的过程中, 是不会有拷贝操作的. 即最后我们生成的生成的 ByteBuf 对象是和 bytes 数组共用了同一个存储空间, 对 bytes 的修改也会反映到 ByteBuf 对象中.
Unpooled 工具类还提供了很多重载的 wrappedBuffer 方法:
public static ByteBuf wrappedBuffer(byte[] array)public static ByteBuf wrappedBuffer(byte[] array, int offset, int length)public static ByteBuf wrappedBuffer(ByteBuffer buffer)public static ByteBuf wrappedBuffer(ByteBuf buffer)public static ByteBuf wrappedBuffer(byte[]... arrays)public static ByteBuf wrappedBuffer(ByteBuf... buffers)public static ByteBuf wrappedBuffer(ByteBuffer... buffers)public static ByteBuf wrappedBuffer(int maxNumComponents, byte[]... arrays)public static ByteBuf wrappedBuffer(int maxNumComponents, ByteBuf... buffers)public static ByteBuf wrappedBuffer(int maxNumComponents, ByteBuffer... buffers)这些方法可以将一个或多个 buffer 包装为一个 ByteBuf 对象, 从而避免了拷贝操作.
通过 slice 操作实现零拷贝slice 操作和 wrap 操作刚好相反, Unpooled.wrappedBuffer 可以将多个 ByteBuf 合并为一个, 而 slice 操作可以将一个 ByteBuf 切片 为多个共享一个存储区域的 ByteBuf 对象.ByteBuf 提供了两个 slice 操作方法:
public ByteBuf slice();public ByteBuf slice(int index, int length);不带参数的 slice 方法等同于 buf.slice(buf.readerIndex(), buf.readableBytes()) 调用, 即返回 buf 中可读部分的切片. 而 slice(int index, int length) 方法相对就比较灵活了, 我们可以设置不同的参数来获取到 buf 的不同区域的切片.
下面的例子展示了 ByteBuf.slice 方法的简单用法:
ByteBuf byteBuf = ...ByteBuf header = byteBuf.slice(0, 5);ByteBuf body = byteBuf.slice(5, 10);用 slice 方法产生 header 和 body 的过程是没有拷贝操作的, header 和 body 对象在内部其实是共享了 byteBuf 存储空间的不同部分而已. 即: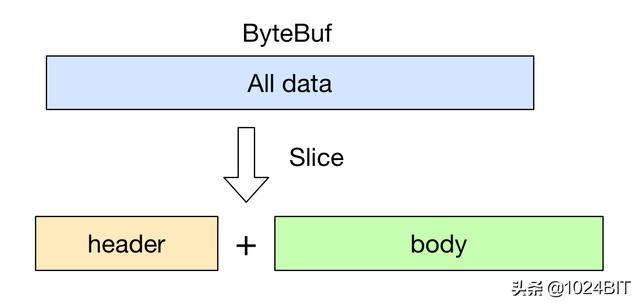 文章插图
文章插图
通过 FileRegion 实现零拷贝Netty 中使用 FileRegion 实现文件传输的零拷贝, 不过在底层 FileRegion 是依赖于 Java NIO FileChannel.transfer 的零拷贝功能.
首先我们从最基础的 Java IO 开始吧. 假设我们希望实现一个文件拷贝的功能, 那么使用传统的方式, 我们有如下实现:
public static void copyFile(String srcFile, String destFile) throws Exception {byte[] temp = new byte[1024];FileInputStream in = new FileInputStream(srcFile);FileOutputStream out = new FileOutputStream(destFile);int length;while ((length = in.read(temp)) != -1) {out.write(temp, 0, length);}in.close();out.close();}上面是一个典型的读写二进制文件的代码实现了. 不用我说, 大家肯定都知道, 上面的代码中不断中源文件中读取定长数据到 temp 数组中, 然后再将 temp 中的内容写入目的文件, 这样的拷贝操作对于小文件倒是没有太大的影响, 但是如果我们需要拷贝大文件时, 频繁的内存拷贝操作就消耗大量的系统资源了.下面我们来看一下使用 Java NIO 的 FileChannel 是如何实现零拷贝的:
public static void copyFileWithFileChannel(String srcFileName, String destFileName) throws Exception {RandomAccessFile srcFile = new RandomAccessFile(srcFileName, "r");FileChannel srcFileChannel = srcFile.getChannel();RandomAccessFile destFile = new RandomAccessFile(destFileName, "rw");FileChannel destFileChannel = destFile.getChannel();long position = 0;long count = srcFileChannel.size();srcFileChannel.transferTo(position, count, destFileChannel);}可以看到, 使用了 FileChannel 后, 我们就可以直接将源文件的内容直接拷贝(transferTo) 到目的文件中, 而不需要额外借助一个临时 buffer, 避免了不必要的内存操作.
有了上面的一些理论知识, 我们来看一下在 Netty 中是怎么使用 FileRegion 来实现零拷贝传输一个文件的:
@Overridepublic void channelRead0(ChannelHandlerContext ctx, String msg) throws Exception {RandomAccessFile raf = null;long length = -1;try {// 1. 通过 RandomAccessFile 打开一个文件.raf = new RandomAccessFile(msg, "r");length = raf.length();} catch (Exception e) {ctx.writeAndFlush("ERR: " + e.getClass().getSimpleName() + ": " + e.getMessage() + '\n');return;} finally {if (length < 0}}ctx.write("OK: " + raf.length() + '\n');if (ctx.pipeline().get(SslHandler.class) == null) {// SSL not enabled - can use zero-copy file transfer.// 2. 调用 raf.getChannel() 获取一个 FileChannel.// 3. 将 FileChannel 封装成一个 DefaultFileRegionctx.write(new DefaultFileRegion(raf.getChannel(), 0, length));} else {// SSL enabled - cannot use zero-copy file transfer.ctx.write(new ChunkedFile(raf));}ctx.writeAndFlush("\n");}
- 预计节省|关于减塑环保必胜客做了件大事 而且还做得挺漂亮
- 双行合一|关于Word我们要了解的知识(12)
- 屏幕|太让人气愤了!关于iPhone12出现的“两大问题”,苹果表明态度!
- 目标和意义进行|关于智能的新思考:我们为什么探索性提出智能三定律?
- 关于边缘计算与网络动态加速
- 深入理解Netty编解码、粘包拆包、心跳机制
- iPhone 12还没发售,关于13的消息已经来了,弥补遗憾
- VAIO 侍 14 体验:关于把笔记本做轻量这件小事
- 企业和用户关于隐私数据博弈的均衡点——自主身份
- 少数派的编辑们又买了这 6 样新玩意